


Supabase Row Level Security: Everything You Need to Know
Keyur Patel
June 1, 2026
15 min
Last Modified:
June 12, 2026
If your application uses Supabase to manage user data, securing database access should be a top priority. Supabase Row Level Security (RLS) helps you control exactly who can view, insert, update, or delete data at the row level based on user roles and authentication rules.
Supabase Row Level Security (RLS) is a database-level access control system built on PostgreSQL. When RLS is enabled on a table, every query is filtered by policies you define. By default, no data is accessible at all unless a policy explicitly grants it.
Apps built with AI-assisted scaffolding tools frequently ship with RLS disabled, meaning any user, authenticated or not, can read and write all rows in your database until RLS is turned on and policies are configured. In fact, a 2025 security analysis of AI-generated apps found that 10.3% of tested applications exposed vulnerable Supabase endpoints due to missing or improperly configured RLS policies, leading to the exposure of sensitive user and API data.
If you shipped a Supabase-backed app recently and you are not sure whether your data is protected, this guide walks you through how to check, what broken RLS looks like in practice, and how to fix it without starting from scratch.
What Is Row Level Security?
Row Level Security is a PostgreSQL feature that Supabase uses to control which rows of data each user can access. It is not a Supabase-exclusive invention. It is a standard database capability that Supabase makes easier to configure through its dashboard.
Here is what you need to understand before anything else:
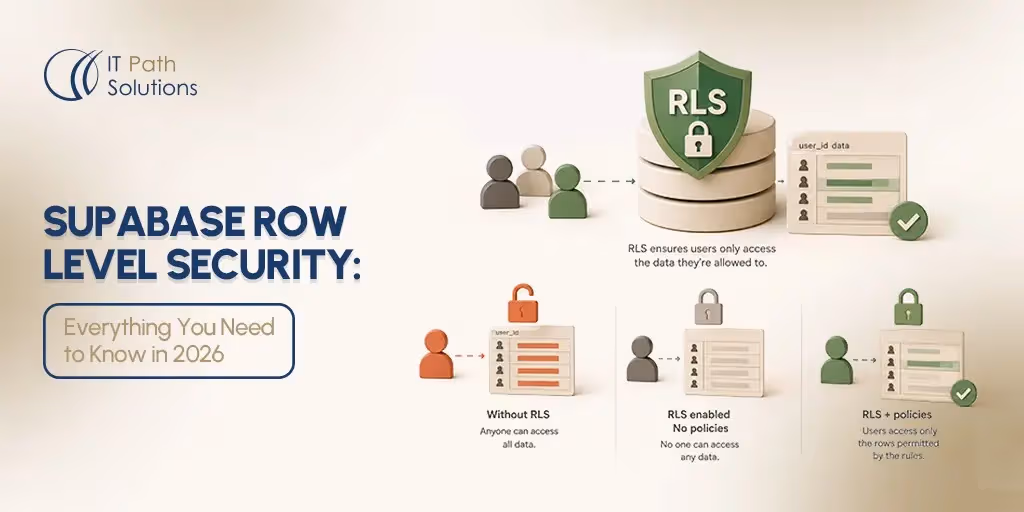
- Without RLS enabled, every row in every table in your database is accessible to anyone who has your Supabase API keys. That includes people who are not logged in to your app.
- With RLS enabled but no policies written, the opposite is true. All data is locked out entirely. Every query returns zero rows. Every write is rejected. This applies to all users, including your own logged-in users. This is not a partial restriction. It is a complete block.
A policy is a rule that tells Supabase which rows a specific user is allowed to see or change. For example, a policy might say “only return rows where the user_id column matches the auth.uid().”
The function auth.uid() is how Supabase knows who is logged in. It returns the unique ID of the currently authenticated user and makes it available inside every policy condition automatically.
One important limitation to understand: RLS applies to client-facing queries only. It does not protect against someone who has direct database access using the Supabase service role key. If your service role key is exposed in your frontend code, RLS will not save you. That is a separate and more serious problem.
What Is Supabase Row Level Security Specifically
Understanding generic Row Level Security is one thing. Understanding how Supabase implements it is where the practical details live.
Supabase sits on top of PostgreSQL and exposes your database directly to your frontend through an auto-generated REST API. That openness is what makes Supabase fast to build with. It is also what makes RLS so important in this specific context.
When you call a Supabase API endpoint from your app, that request hits your database directly. There is no separate application server in between to filter the results. The database itself is responsible for deciding what each user gets back. That responsibility is carried entirely by your Supabase RLS policies.
This is different from how many traditional backends work. In a conventional setup, your server receives a request, checks who the user is in your application logic, and then decides what database query to run. With Supabase, that middle layer does not exist by default. RLS fills that gap at the database level.
Supabase makes three specific additions on top of standard PostgreSQL RLS that are worth knowing:
- The
authschema.
Supabase creates a dedicated auth schema in your PostgreSQL database. This schema holds your user records and session data. Functions like auth.uid() and auth.role() read from this schema to make the currently authenticated user’s details available inside every policy you write. You do not set this up yourself. Supabase handles it automatically.
- Two default roles.
Every Supabase project comes with two built-in database roles that your policies will reference. The anon role represents any request made without a valid login session. The authenticated role represents any request made by a logged-in user. When you write a policy, you specify which role it applies to. A policy set to authenticated only runs for logged-in users. A policy set to anon applies to public requests. Most tables in a user-data app should have no permissive policy for the anon role at all.
- Per-operation policy control.
Supabase row level security policies are not a single on/off switch per table. You write separate policies for each database operation: SELECT, INSERT, UPDATE, and DELETE. A user might be allowed to read their own rows but not update them. Another user type might be allowed to insert new rows but not delete existing ones. Each operation gets its own rule, which gives you precise control over exactly what each type of user can do with each table.
This combination of a direct API, automatic auth context, and per-operation policies is what makes Supabase RLS both more powerful and more consequential than a simple access toggle. When it is configured correctly, it does the work of an entire access control layer. When it is missing, that layer simply does not exist.
Why Apps Built With Lovable and Similar Tools Miss RLS by Default
Tools like Lovable and other AI-assisted app builders can generate a working Supabase project quickly. They create your tables, set up your schema, and wire up your frontend. What they cannot do is write your security policies for you.
Writing an Supabase row level security policy for Lovable requires knowing exactly who should be able to see which rows, under what conditions. That depends on your specific data model and your app’s access requirements. A scaffolding tool has no way to infer that automatically. This is not a flaw in the tool. It is a genuine design constraint.
The result is that the tables these tools create land in your Supabase project with RLS showing as Disabled. That is the default state for any new table in Supabase unless someone explicitly turns RLS on.
Your app may be running in production right now with every user’s data fully readable by any authenticated request, and in some configurations, even by unauthenticated requests. This is a known and documented class of vulnerability for apps built on open database backends. The good news is that the fix does not require rebuilding your app or your schema. It requires enabling RLS on each table and attaching the right policies.
If you want to understand the Lovable-specific side of this in more detail, the Lovable login fix guide covers related auth configuration issues you may also encounter.
The 3-Minute Diagnostic: How to Check If Your Supabase RLS Is Off Right Now
You do not need to read any code to check your Supabase row level security status. Here is how to do it directly from the Supabase dashboard.
Step 1: Go to app.supabase.com and open your project.
Step 2: In the left sidebar, click Table Editor.
Step 3: Look at the list of tables on the left panel. Each table displays its RLS status. If a table shows RLS Disabled, that table’s data is unprotected.
Step 4: Check every table in your project. RLS in Supabase is not a global setting. It must be enabled on each table individually. A table called users and a table called orders each need their own RLS configuration.
Step 5: Make a note of every table showing as Disabled. Those are the ones you will fix in the next section.
Note: If all your tables show RLS as Enabled but you are still seeing unexpected data exposure in your app, the issue is likely a missing or overly permissive policy rather than a disabled toggle. The fix steps below cover that scenario too.
The dashboard view may look slightly different depending on which version of Supabase your project is running or which plan tier you are on. If what you see does not match the steps above, refer to the official Supabase documentation for your specific version.
5 Symptoms That Mean Your Supabase RLS Is Broken
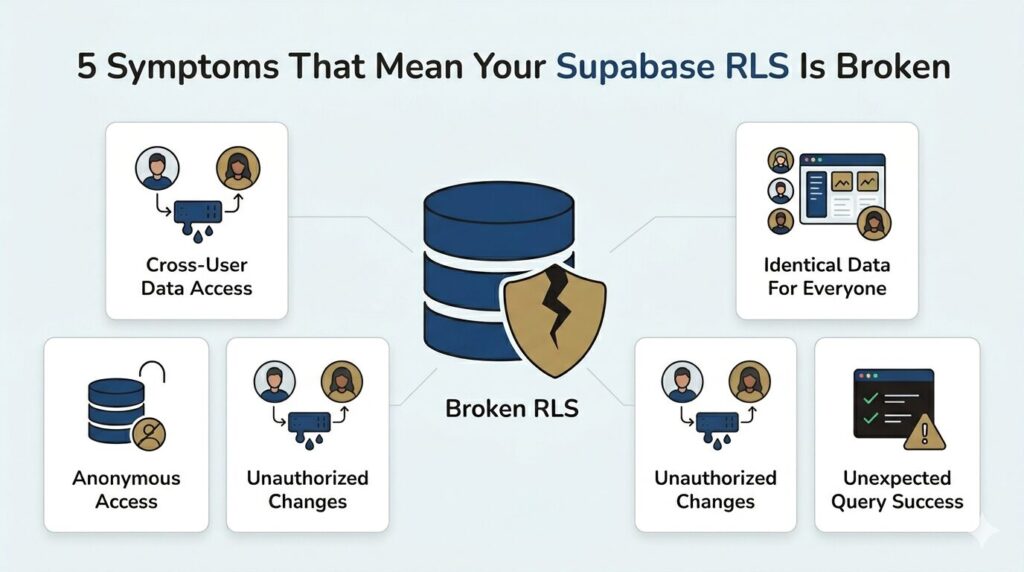
Sometimes you notice a problem in your app before you think to check the database. These are the five most common signs that your Supabase Row Level Security is disabled or misconfigured.
- User A can see User B’s private data.
A logged-in user’s dashboard shows records that belong to a completely different account. This is the clearest symptom that row-level isolation is not working.
2. All users see the same data regardless of who is logged in.
Your queries return the full contents of a table no matter which account is authenticated. Logging out and back in as a different user makes no difference to what is returned.
3. Logged-out users can still fetch data.
Your API returns rows even when no session token is present. An unauthenticated request should return nothing from a protected table. If it returns rows, RLS is not enforcing access at all.
4. A user can edit or delete records they did not create.
Write operations succeed on rows that should belong only to a different user. This means your INSERT, UPDATE, or DELETE policies are missing or incorrect.
5. Your Supabase logs show queries succeeding that should be blocked.
In the Logs section of your dashboard, you can see SELECT or UPDATE queries from the anon role returning rows from tables that should be restricted to authenticated users only.
These symptoms can also result from policies that exist but are written too permissively, not just from RLS being completely disabled. Running the 3-minute diagnostic above will tell you which situation you are in.
Note: Reading the Supabase Logs panel requires some familiarity with the dashboard. If you are not comfortable interpreting those logs, focus on the first four symptoms, which are visible directly in your running application.
How to Fix It, Step by Step, Without Rebuilding
You do not need to touch your frontend code or rebuild your schema. Everything here happens inside the Supabase dashboard.
- Step 1:
In the Table Editor, click on the first table that is showing RLS as Disabled. Look for the Enable RLS toggle or button within the table settings and turn it on.
Warning: The moment you enable RLS on a live table, all client-facing access to that table stops until you add a policy. If you have active users, do this during a low-traffic window or move immediately to Step 2 without delay.
- Step 2:
Navigate to Authentication in the left sidebar, then click Policies. Select the table you just enabled RLS on. Click New Policy.
- Step 3:
For a standard setup where users should only see their own rows, choose the template labelled something like “Enable read access for users based on their user ID.” This creates a SELECT policy using auth.uid().
Here is what that policy does in plain terms: auth.uid() is the unique ID of the user who is currently logged in. The policy checks whether that ID matches the value in a column called user_id on each row. If it matches, the row is returned. If it does not match, the row is hidden. Only the right user sees the right data.
This template assumes your table has a user_id column that stores the ID of the user who owns that row. If your schema does not have this column, a more complex policy is needed. That is a situation where getting professional input is worth it before making changes to a live database.
- Step 4:
A SELECT policy only covers reading. If your users also need to create, update, or delete their own rows, you need separate policies for INSERT, UPDATE, and DELETE. Each operation type requires its own policy. Repeat the process from Step 2 for each one.
- Step 5:
Repeat Steps 1 through 4 for every table that showed RLS as Disabled in your diagnostic.
Some features within the policy editor, such as advanced templates, may vary depending on your Supabase plan tier. If you run into limits, the Supabase free tier limits guide explains what is available at each level.
What to Check After Fixing
Enabling RLS and adding policies is not the end of the process. Run through these five checks to confirm everything is working correctly before you consider the job done.
- Check 1:
Log into your app as a test user. Confirm you can see that user’s own data. If your policies are correctly configured for the authenticated role, this should work normally.
- Check 2:
Log out of your app entirely. Attempt to access the same data through your app or directly via the API. Confirm that the data is no longer accessible in an unauthenticated state. The anon role should be blocked.
- Check 3:
Log in as a second, separate test user. Confirm you cannot see the first test user’s data. This verifies that row-level isolation is actually working between accounts.
- Check 4:
As your test user, try to create a new record, edit an existing one you own, and delete one. Confirm these operations succeed. Then try to edit or delete a record that belongs to the other test user. Confirm that operation fails or returns an error.
- Check 5:
Go back to Authentication > Policies in your dashboard. Confirm that every table that previously showed RLS as Disabled now has at least one active policy listed for each operation type you need (SELECT, INSERT, UPDATE, DELETE).
If any of these checks fail, return to your policies and review the conditions. The most common mistakes are referencing a column name that does not exist on that table, or a type mismatch when comparing user IDs.
These manual checks are a good starting point. For production apps handling sensitive user data, automated policy testing as part of a deployment pipeline is the more robust long-term approach.
If your schema is more complex than the standard user_id pattern, or if these checks are revealing problems you are not sure how to fix, that is exactly when working with an experienced development team saves significant time.
Need Help Getting This Right?
If the self-serve steps above have not resolved your issue, or if your data model is more complex than a single user_id relationship, the IT Path Solutions ship faster service is built for situations like this. The team at IT Path Solutions has spent a decade helping startups and growing companies ship secure, production-ready applications.
If you are not confident your Supabase security is solid, book a free session with IT Path Solutions and get a clear answer fast.
For teams evaluating their backend options more broadly, the Supabase alternatives guide covers how other platforms handle data access control by comparison.
Frequently Asked Questions
- What is Row Level Security in Supabase?
Row Level Security in Supabase is a database-level access control feature built on PostgreSQL. When enabled on a table, it enforces policies that determine which rows each user can read, create, update, or delete. Without RLS enabled, all rows in a table are accessible to any request that reaches your Supabase API, authenticated or not. With RLS enabled and no policies written, all access is blocked entirely.
2. What happens if RLS is enabled but no policies are defined?
If you enable Row Level Security on a Supabase table but do not create any policies, every query to that table will return zero rows and every write will be rejected for all users, including your own. This is not an error message. The queries will execute silently and return empty results. Always add at least one policy immediately after enabling RLS on a table to avoid locking legitimate users out of their own data.
3. How do I enable RLS in Supabase?
To enable Row Level Security in Supabase, open your project in the Supabase dashboard, navigate to the Table Editor, select the table you want to protect, and toggle Row Level Security to enabled. After enabling, immediately navigate to Authentication and then Policies, and create at least one policy for that table. Repeat this process for every table in your project. RLS must be enabled and configured on each table individually.
4. How does Supabase RLS work with authentication?
When a user logs into a Supabase app, Supabase generates a JSON Web Token (JWT) containing their unique user ID. Every database query made through the Supabase client automatically includes this JWT. PostgreSQL reads the JWT and makes the user’s ID available inside policy conditions via the function auth.uid(). A policy that checks auth.uid() = user_id ensures that only rows where the user_id column matches the logged-in user’s ID are returned to that user.
5. Does Supabase RLS affect performance?
Row Level Security adds a small overhead to every query because PostgreSQL must evaluate the policy condition against each row. For most applications, this overhead is negligible. Performance impact becomes more noticeable on very large tables with complex multi-condition policies. The standard way to reduce this impact is to add a database index on the column used in your policy condition, typically user_id. For the vast majority of startup and small-to-mid-scale applications, RLS performance impact is not a practical concern.
6. Is Row Level Security the same in Supabase and PostgreSQL?
Yes. Supabase Row Level Security is PostgreSQL’s native RLS feature, not a proprietary reimplementation. Supabase adds convenience layers including a dashboard interface for creating policies, built-in integration with its authentication system via auth.uid() and auth.role(), and policy templates, but the underlying mechanism is standard PostgreSQL. Any policy syntax valid in PostgreSQL is valid in Supabase, which means both Supabase RLS documentation and PostgreSQL RLS documentation are valid references for writing policies.

Keyur Patel
Co-Founder
Keyur Patel is the director at IT Path Solutions, where he helps businesses develop scalable applications. With his extensive experience and visionary approach, he leads the team to create futuristic solutions. Keyur Patel has exceptional leadership skills and technical expertise in Node.js, .Net, React.js, AI/ML, and PHP frameworks. His dedication to driving digital transformation makes him an invaluable asset to the company.
Related Blog Posts

How to Build an AI Influencer Platform in 2026: The Next Frontier for Brands, Creators, and Digital Product Teams

Supabase Free Tier Limits: What Actually You Need to Know in 2026
